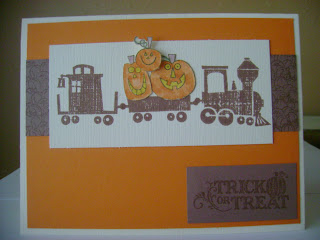
 Today's card is for Pals Paper Arts (PPA). The challenge was to make a Halloween project. I did a card because I find them easier. It took me a while to get started because I don't have any Halloween stamps sets or designer paper. I was looking through my stamps and found "Choo Choo" which I haven't used in awhile. I decided to stamp the pumpkins from "The More the Merrier" on Very Vanilla, cut them out and stack three of them in the cargo piece of the train. I also decided to make my own "designer" paper. I stamped the pumpkins from "Loads of Love Accessories" in versmark on Close to Cocoa. I also used Versamark to stamp "Trick or Treat" from "Holiday Best" on Close to Cocoa for the sentiment. The orange is Pumpkin Pie.Be sure to stop by www.palspaperarts.com to join in the challenge. You might even get addicted like me!Thanks for visiting and I hope you enjoy this card.-Roberta

 Today's card is one based on a mojo monday sketch by Mary Fish. I have been doing a lot of Christmas cards lately and when I saw this sketch, I knew it would be perfect for the Merry Moments DSP. Here is her sketch. As you can see, I used the same layout except for the brads. I used mine to frame the larger image. I love this sketch and am planning to use it with some of my other designer papers.The card base is Very Vanilla textured card stock. I made my small squares 1 1/4" x 1 1/4". The larger layer is 2 3/4 x 3 Old Olive on top of 3 x 3 1/4 Very Vanilla. I used Versamark and the snowflakes from Christmas Punch on the Old Olive. The scallop is stamped in Old Olive with the "Merry Christmas" stamp from Holiday Best Hostess and punch with the scallop circle punch. I used the silver brads in the four corners of the Old Olive and attached everything with snail adhesive. All product are from Stampin' Up!Thanks for visiting and I hope you enjoyed this card.-Roberta
 It's mojo monday time!! Here is the sketch for this weeks mojo monday.
 I followed the sketch pretty closely this week. Even my color choices are almost the same.The ribbon is the only non SU product I used on this card. I am not going to do a recipe for this card today because it is very straight forward. I will tell you that I used Pink Passion on the top and Pixie Pink on the bottom. The patterned paper is Melon Mambo. I Versamardked all the words and used Pink Passion for the hearts. The ribbon says "princess" all over it and has green butterflies and the dark pink crown. I got it so long ago that I do not remember where I got it from.Thanks for visiting and I hope you enjoyed the card for mojo101.-Roberta

 Two challenges mean two posts! I couldn't combine these challenges. One was a card and the other was anything but a card. This one is for mojo monday turns 100 day 4. Here is the sketch we were supposed to use. As you can see, I didn't use the exact sketch, but that is okay. I am not going to do a complete recipe for this card because there is a lot to it. It is not complicated but with two posts, I don't want to write too much. I did use The More the Merrier set, Two Cool Dudes, Eat Cake and Warm Words. The colors are Handsome Hunter, Bravo Burgundy and Whisper White with a little Ballet Blue and Versamark. If you want more info, just write me a comment and I will get back to you. Thanks for visiting and have a good day. Remember Tax Free Weekend in Texas starts tomorrow and Stampin' Up! has some things available tax free!! Send me a comment if you want more info on how and when you can save.-Roberta
 I love to play at PPA! This weeks challenge is to make anything but a card. I saw th
 is tutorial on Splitcoaststampers.com and new I had to try it. It is a scallop envelop box. It is very easy.
- First cut out four scallop envelopes using your big shot. I used Pacific Point textured card stock because I love that color and am sad it retired.
- Next, glue the flaps of the envelopes together to form a cube.
- Now fold the bottoms under overlapping them. They should stay by themselves, but I glued them just to make sure they would stay.
- Take a piece of 2 1/8 x 12 1/2 DSP, I used Delicate Dots because I have a lot and it looks good with Pacific Point. Adhere one side to the front of your box. Wrap the DSP around the box, creasing the corners as you go. Adhere the other edge to the front. The edges won't match up but that is okay, it will get covered up.
- Layer a piece of 2 1/8 x 2 3/4 card stock the same color as your box (Pacific Point) onto a piece of 2 x 2 1/2 Whisper White. Stamp your sentiment on the Whisper White in the same color as your box. I used the Yummy stamp set. Attach this layer to your box. I also added a little "with love" sentiment at the bottom in Pink Pirouette.
- Done!
I used all retired elements because I had plenty of them and I really like the colors and how they go together. This will obviously work with any color combo that you wish to use.Thanks for visiting and be sure to stop by www.palspaperarts.com and play along. You will be saying "I love to play at PPA!" before you know it.-Roberta

 Today is another mojo monday. The sketch is from day 3 mojoteresa. You can get more info and play along at mojomonday.blogspot.com.Here is the recipe.
- First take a piece of 8 1/2 x 5 1/2 Basic Black and fold in half to make your card base.
- Next cut a piece of 5 1/4 x 4 Holiday Lounge DSP and adhere to card base.
- Cut a piece of 3 x 1 1/4 Basic Gray textured card stock and adhere to cardbase 3/8" from bottom.
- Now cut another piece of Holiday Lounge DSP to 5 1/4 x 2 and adhere to card base.
- With the tree paper from Holiday Lounge DSP, cut a piece 1 1/2 x 5 1/4. Trim edge to border trees and adhere to card base.
- On a piece of 2 3/4 x 2 Whisper White, Stamp the truck from Loads of Love in Basic Gray. Color in with Taken with Teal marker. Stamp lady from LOL accessories in Ruby Red. Adhere to card base.
- On Basic Gray, stamp "Wishing you Loads of holiday cheer!" from LOL set in Ruby Red. Punch out with scallop circle punch. Attach to card with dimensionals.
- To make your button, follow the directions from this post from splitcoaststampers. http://www.splitcoaststampers.com/forums/showthread.php?t=454034 The tutorial is not fully in English but she has lots of pictures and some descriptions in English. Attach a sliver of Whisper White to the button as thread and adhere button to truck bed.
- Done!
I don't have any glossy accents or clear embossing powder so my button doesn't shine. I had a lot of fun making this button and will probably make more. Thanks for visiting and have a good day.-Roberta
 Mojo monday is turning 100 this week. To celebrate, they are doing a full week of sketches. Here is the sketch for day two.
 Here is the card I made based on this sketch. I am still working on the lighting; sorry for the glare. I have been working on a lot of Christmas cards lately. It's never too early for Christmas, in my opinion. Here's the recipe.
- First, take a piece of 5 1/2 x 8 1/2 Whisper White and fold in half to make your card base.
- Cut a piece of Merry Moments DSP to 5 1/4 by 4 and adhere to card base, leaving middle edges free.
- Cut out a piece of Real Red textured cardstock and Merry Moments DSP using the Top Note and the Big Shot. Layer together and adhere to card base.
- Cut a piece of Real Red grossgain ribbon to 6". Adhere to card base tucking edges under Merry Moments DSP.
- With a piece of Real Red textured cardstock punch one edge with the eyelet punch. Trim to 1 1/2 x 4. Adhere over ribbon to base.
- Stamp "Merry Christmas" from Holiday Best stamp set onto 2 x 2 piece of Whisper White. Adhere to 2 1/4 x 2 1/4 piece of Real Red textured cardstock. Adhere to card base.
- Finally cut a 3 1/2 piece of Real Red grossgrain ribbon. Tie a knot in middle, trim edges and adhere to card. Done!
I hope you enjoy this card as much as I do. Stop by mojomonday.blogspot.com and make your own version.If you live in Texas, tax free weekend is this weekend and some of Stampin' Up! merchandise is tax free. Contact me to find out which items are included. Remember the items are only tax free this Friday, Saturday and Sunday, so don't wait!Thanks for visiting and have a good day.-Roberta
 Today I have been playing around with different color combos. On this card I used Rich Razzelberry and So Saffron. I saw a layout on Splitcoaststampers and decided to change it up a little. So here is the recipe.
 - First, take a piece of 8 1/2 x 5 1/2 Rich Razzelberry and fold in half to make card base. Set aside.
- Next, on a piece of 2 x 3 Whisper White, stamp the cupcake from Crazy for Cupcakes in Basic Gray. Color in the base, sprinkles and flame with So Saffron. Color the icing with Rich Razzelberry and the candle with Dusty Durango. Adhere to a piece of 2 1/4 x 3 1/4 Rich Razzelberry. Adhere this layer to a piece of 2 1/2 x 3 1/2 So Saffron. Adhere these layers to card base.
- Stamp "happy birthday to you" in Rich Razzelberry on Whisper White. Punch out with scallop circle punch. Turn around so you see the words upside down. Punch to make smaller scallop circle. Layer onto So Saffron scallop circle. Adhere circle layer to upper right corner of card base. Done.
Thanks for visiting and I hope you enjoy this card. Have a good weekend! -Roberta

 This week PPA has an inspiration challenge. Take this Pottery Barn Kids picture and create a project. I had a hard time deciding what to do until I thought about my daughter going to first grade in a little more than a week. I think something is missing from my card but I can't figure out what that is. Onto the recipe for the card.
- First, take a piece of 5 1/2 x 4 1/2 Gable Green and foldin half to make your card base. Set aside.
- To make the pattern for the Big Shot piece, take strips of 1" width Pacific Point and Baja Breeze and adhere to printer paper. Roll through Big Shot with the Top Note die. Adhere to card base.
- Print out "An apple for the teacher" on Whisper White cardstock. Punch out with circle scallop punch and brush edges over Real Red stamp pad. Attach to card base with dimensionals.
- Attach a piece of Real Red grossgrain ribbon onto card base over Top Note.
- Now stamp the truck from Loads of Love in Basic Grey on Whisper White cardstock. Color in with Crushed Curry. Cut out and adhere to card base.
- Cut out an apple shape from Read Red textured cardstock and adhere to card in bed of truck. Cut out leaf shape from Garden Green and adhere to apple. Cut stem shape from Chocolate Chip and adhere to apple.
- Finally, cut a small piece from Real Red grossgrain ribbon and tie around ribbon already on card. Done.
Thanks for visiting and be sure to stop by Pals Paper Arts to join in the challenge.-Roberta
 I made today's card with some inspiration from Andrea Walford (www.andreawalford.com) and Teri Anderson (http://terisplace.wordpress.com). They both did simple yet stunning cards with this layout. I made mine with the Merry Moments DSP.
 - First, fold a piece of 5 1/2 x 8 1/2 very vanilla textured cardstock in half to make your card.
- Cut a piece of 3 1/2 x 4 1/2 piece of Merry Moments DSP and layer it on top of a piece of 3 3/4 x 5 Old Olive.
- Next take you "Merry Christmas" stamp from All Holidays and stamp in Chocolate Chip onto 1 x 2 3/4 piece of Very Vanilla textured cardstock. Layer this on to a piece of 1 1/4 x 3 Chocolate Chip.
- Adhere your Merry Moment/ Old Olive piece to your card base, and add your "Merry Christmas" to your new layered card base.
It is as simple as that. Be sure to check Pals Paper Arts for their new challenge tomorrow! Thanks for visiting.
-Roberta
 Today's card is from this weeks PPA challenge. If you don't already know, PPA stands for Pals Paper Arts. They are an amazing group with amazing talent. Stop by their website at www.palspaperarts.com and play along. It's a lot of fun and will have you saying "I love to play at PPA!Now for the card. I absolutely LOVE the Loads of Love stamp set. I wanted to do a Christmas card today since I did Fall yesterday.
- First you cut your Taken with Teal cardstock and cut it to 5 1/2 x 8 1/2. Then fold it in half making your card size 5 1/2 x 4 1/4.
- Now take a piece of Whisper White and cut it at 4 x 5 1/2. Use you eyelet punch to make ruffle edge.
- Next cut your Holiday Lounge DSP to 3 3/4 x 5 1/2 and ruffle you edge. Adhere to your Whisper White cardstock at the top then adhere the layers to the Taken with Teal card at the top.
- Get a piece of Sahara Sand and cut to 2 1/4 x 3. Layer it under a piece of 2 3/4 x 2 Whisper White. Stamp the truck in Basic Grey and color in with Taken with Teal. Use Bordering Blue on the hub caps and door handle. Stamp the presents in Melon Mambo in the back of the truck.
- Finally, stamp "Wishing you Loads of holiday cheer!" in Taken with Teal on Whisper White cardstock and punch out with the scallop circle. Attach to card with dimensionals.
Thanks for visiting.Roberta
 I know it is a little early for fall but why not get a jump start. I just love the Loads of Love set and the accessory set. They are good sets to use for almost every occasion. The picture doesn't do the card justice. The Elegant Eggplant card stock doesn't show its true color in this picture. I am trying to work on better lighting. Now for the card:
- Take an 8 1/2 x 11 piece of More Mustard and cut it in half lengthwise and fold in half. Your card should now be 5 1/2 x 4 1/4.
- On a piece of 2 x 3 Whisper White, stamp the truck from Loads of Love in Soft Suede.
- With you stamp-a-ma-jig, stamp the pumpkins for LOL accessories in Pumpkin Pie.
- Layer your truck piece onto a 2 1/2 x 3 1/2 Elegant Eggplant. Adhere this to your More Mustard 1/2" from top.
- Cut a 4 1/2 x 2 1/4 piece of Autumn Harvest DSP and adhere to bottom of your card.
- On a piece of 1 x 1 Whisper White, stamp "happy harvest" and adhere to a piece of 1 1/2 x 1 1/2 Soft Suede.
- Finally, adhere your "happy harvest" layered piece to your card over the DSP.
Hope you enjoy this card as much as I do. Thanks for visiting.Roberta
 I made this card to sell as a set at the Scarecrow Festival in Chappell Hill in October. I used the new In Color Bermuda Bay and the new Designer Paper Holiday Lounge from Stampin' Up! I also used Taken with Teal, Ruby Red and Whisper White. The two punches are the scallop circle and the small tag punch.
Thanks for visiting,
Roberta

I just set up my first blog! I don't have much time today, but I will start posting pictures with my blogs as soon as possible. I don't have any experience with blogging, and I think it might be a bumpy ride. Thanks for visiting and come back to enjoy the ride.Roberta


