Wednesday, December 23, 2009

Sneak Peek

Here she is!! This is a 6" x 6" scrapbook page made with the Stampin' Up! Build-a-Bear die. Her clothes are from the Beary Essentials Die and her necklace, hair bow, flower and "LOVE" heart are from the new Bearly Lovely die that will be available January 5, 2010. The hearts are punched with Heart to Heart punch and the new Small Heart punch available January 5, 2010.

The new occasions mini and the new Sale-a-Bration catalogs have many new and exciting products in them. Be on the look out for the new catalogs; you won't want to miss them!

This scrapbook page was made with Chocolate Chip, Ruby Red, and Very Vanilla. I used DSP for her skirt and a couple of the hearts.

Hope you enjoy this page and Merry Christmas!!! Thanks for visiting.
-Roberta

Tuesday, December 22, 2009

Internet is back and TMITA challenge


First, let me tell you how happy I am that the internet is working again!! How ever did we survive before the world wide web?

Now, today's card is one I made for There's Magic in the Air challenge. This week they provide you with a free digital image and a sketch. You do the rest. This is what I came up with. I used Old Olive and Ruby Red card stock. The DSP is from Merry Moments, the sentiment is from Fundamental Phrases, and the snowflake is the new snowflake punch from Stampin' Up!

I hope you like this card and stop by There's Magic in the Air to try the challenge for yourself.

Merry Christmas!!
-Roberta

Tuesday, December 15, 2009

Internet problems

I have been working on some Valentine's Day cards and projects but my internet doesn't want to work right. I keep trying to upload the pictures but the internet won't stay open long enough for them to upload. I will share the projects as soon as the internet lets me.

Thanks
-Roberta

Friday, December 11, 2009

There's Magic in this card


This card is for a contest at There's Magic in the Air. They are having a blog hop this week with prizes if you complete all the steps. You can play along here. I had a lot of fun. They have a different recipe on each stop of the hop for you also. Be sure to stop by even if you don't want to play.

The requirements for the final step in the blog hop are to use their FREE digital image along with:
  • one tag (scallop circle punch)
  • two textures (petals-a-plenty embossing folder & one non SU pattern)
  • 3 pattern papers (icing on cupcake, background layer behind cupcake and extra layer)
  • 4 pieces of ribbon (2 for bow on tag & 2 for decoration and embossed rectangle)
  • 5 rads or buttons (sprinkles on icing)
  • It was also said that you can use 1 color card stock outside the base of the card. I used Melon Mambo for my card base and Whisper White as my other color.
The stamp on the tag came from Stampin' Up!s new set Well Scripted stamp set. This stamp set will be available January 5, 2010 when the new Occasions Mini Catalog debuts. In the Occasions Mini Catalog, you find many new stamp set in wood mount and now clear mount. There will also be some new punches with corner punches that coordinate together. Be on the look out after the first of the year!

Thanks for visiting and have a great weekend!

-Roberta

Wednesday, December 9, 2009

There's Magic in the Air Blog Hop

I just finished the blog hop over at There's Magic in the Air. They have great project and great recipes. "Paper Cupcakes Where The Main Ingredient Is Love." Check them out here.

Thanks for visiting.

-Roberta

Pull Out Scrapbooks

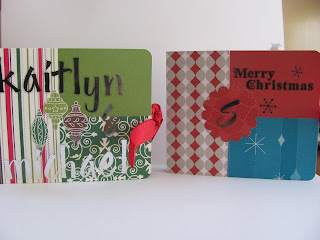
Today I made two pull-out srapbooks. They are going to be Christmas gifts. I got the pattern/template for them from Splitcoaststampers.com and you can find it here.


This is what the inside looks like when you first open it up.


When you open it up all the way, you get 14 squares for pictures/ journaling. I haven't finished mine because my printer does not want to print right now. I plan on putting pictures of my two kids at different ages on the squares.

I used DSP from Merry Moments, Holiday Lounge and Christmas Cocoa. The ribbon, stickers and rub-ons are all non Stampin' Up!

I hope you enjoy these scrapbooks and thanks for visiting.

To order your own supplies to make this project, click here.

-Roberta

Thursday, December 3, 2009

Loads of Trees


Today's card is one I created for this weeks Pals Paper Arts Inspiration challenge. I am not going to give step by step directions today. Instead I will give you a few particulars. I used a standard 5 1/2 x 4 1/4 Chocolate Chip card base. My piece of Very Vanilla was run through the Big Shot with the Petals-A-Plenty Textured Impressions folder. The truck is from the Loads of Love stamp set. The "trees" in the bed of the truck are from the Jumbo Snowflake punch. I simply cut the snowflake apart and used the pieces for trees.

This challenge was fun and I got to use my two newest purchases from Stampin' Up! The sales period for the Holiday Mini Catalog is almost up. You only have until January 4 ,2010 to purchase from the Holiday Mini. If you want something now would be the perfect time to order to ensure Christmas delivery! Click here to order.

Thanks for stopping by. Be sure to check out Pals Paper Arts to try the challenge for yourself. Have a great day.

-Roberta

Thursday, November 26, 2009

Happy Thanksgiving

No card for today. Just wanted to wish everyone a Happy Thanksgiving! Hope you get to spend some quality time with family and friends. A little reminder: Stampin' Up! is having their Holiday Extravangza sale this week. There are a lot of really good deals on stamp sets and bundles! Stop by my website to see the deals. You can order online and have everything sent directly to your home. http://roberta_smith.stampinup.net Thanks for visiting and Happy Thanksgiving!!

Monday, November 23, 2009

Yippee! It's almost Christmas!


Can you believe it? I got my mojo monday card done and posted on Monday!! First time ever. For today's card I
  • started out with a 5 1/2 x 4 1/4 piece Very Vanilla.
  • I layered a piece of 5 1/4 x 4 Old Olive on and then a piece of the green stripe from Merry Moments DSP.
  • For the scallops on the top, I used a piece of Very Vanilla and Old Olive punched with the eyelet punch and cut to size. These were topped off with a strip of green stripes from Merry Moments DSP and layered on the card base.
  • For the tree, I the Yippee Kiyay Holiday stamp set. It is stamped in Black Stazon on Very Vanilla. I colored it with Old Olive, Summer Sun, Ruby Red, and Not Quite Navy and layered it on a piece of Old Olive and then on the card base.
  • Done!

Hope you enjoyed this card and be sure to stop by and try the mojo monday sketch for yourself. Thanks for visiting and have a great day.

-Roberta

Friday, November 20, 2009

Dasher


Sorry about the picture quality. I haven't been able to get the lighting quite right lately. Today's card is for Pals Paper Arts sketch challenge. It is a simple card sketch, but I just couldn't get what I really wanted. This is what I have settled for.

  • I started out with a standard 5 1/2 x 4 1/4 Basic Black card base.
  • On a 2 1/2 x 2 1/2 Basic Black square I stamped Dasher with my new Frost White Shimmer Paint. I then cut him in half both ways. Each 1 1/4 square is mounted on a 1 1/2 square of Ruby Red Holiday Lounge DSP. These four squares are then mounted on to a 3 1/2 square of Whisper White and then adhered to the card base.
  • For the sentiment, I again used my new Frost White Shimmer Paint and the "Merry Christmas" stamp from Holiday Best on Basic Black. This was punched out with the scallop circle punch. I punched another scallop circle from the same Ruby Red Holiday Lounge DSP and layered the two circles together.
  • The ribbon is the Whisper White Organza ribbon. I simply tied a small knot and adhered it to the inside of the card and to the back of the scallop circle layer.
  • Done!
I haven't used a Basic Black card base in a while so I hope you enjoy this one. Stop by Pals Paper Arts to try the challenge or just see what the other stampers have come up with. You might get some inspiration. Thanks for visiting.

-Roberta

Wednesday, November 18, 2009

Baby Onesie


I have been eyeing this onesie template for awhile now but haven't had an occasion to make one (until now). My brother and sister-in-law just had a baby girl! She is my first niece and I can't wait to see her on Thanksgiving. I used the template found here: onesie template. The lady who made this template is very talented and her instructions are easy to follow.

  • For my card, I started with an Old Olive 4 1/4 x 5 1/2 card base with the fold on top.
  • I used my scallop circle punch and the Pawsitively Prints DSP for the ruffles around the legs and neck.
  • I used my eyelet punch for the arms and the Stampin' Up! sizzlets Birds & Blooms die for the big shot for the bird.
  • On the inside of the card I put some more Pawsitively Prints DSP and will put the baby's name and "Congrats on your new baby".
  • Done!
This card was very easy to do and can be changed up easily for a boy. I hope you enjoyed this card and thanks for visiting.

-Roberta

Tuesday, November 17, 2009

be merry


Once again I am late for mojo monday. Oh well, better late than never I say! Today, I wanted to do something a little more simple. I only used one stamp.

  • I started out with a standard card (5 1/2x 4 1/4) in Soft Suede. I used one of the designs from the Christmas Cocoa Specialty paper cut at 5 1/4 x 4 which is layered on the card base.
  • I cut a piece of the Real Red paper from the Christmas Cocoa Specialty paper at 5 1/4 x 1 1/2 and layered it to the card base.
  • On a piece of 2 1/2 x 4 Soft Suede, I layered yet another design from the Christmas Cocoa Specialty paper cut at 2 1/4 x 3 3/4.
  • For the top layer, I cut a piece of Soft Suede at 3 1/2 x 3. I layered a piece of 3 1/4 x 2 3/4 Very Vanilla. I stamped the "be merry" from the Warm Words stamp set in Real Red.
  • The bird and poinsettia were both made with Stampin' Up!'s Birds and Blooms Sizzlets dies for the Big Shot. I punched tiny Yo-Yo Yellow dots for the eye and center of the poinsettia. The poinsettia is popped up with dimensionals.
  • Done!

I am using this card for two challenges this week; mojo monday 113 and Pals Paper Arts (PPA16). Be sure to stop by both sites and try the challenges for yourself. They are great fun!! Thanks for visiting and have a great day.

-Roberta

Thursday, November 5, 2009

Holiday Extravaganza


Stampin' Up! is having a Holiday Extravaganza! From now until January 4, 2010 make Stampin' Up! your one-stop shop for all your holiday gift-giving needs. With this Gift-Giving Guide you can quickly & easily find gifts for kids, teens, neighbors and more!

Plus, for every $50 you spend on products in the Gift-Giving Guide, you can choose a FREE Decor Element (value up to $16.95).

Visit my personal website for more details.
http://roberta_smith.stampinup.net

Wednesday, November 4, 2009

Jolliest Time of the Year


I don't know why I can't seem to get my mojo monday card done on Monday. I looked at the sketch and thought that I would be able to get it done, but once again I am late. Better late than never I guess. Here's how it goes:

  • First, I started out with a 5 1/2 x 4 1/4 Whisper White card base. On to the base, I layered a 5 1/4 x 4 1/2 piece of Ruby Red. On top of that, I layered a 3 1/2 x 3 3/4 piece of Holiday Lounge DSP.
  • On a piece of 1 1/2 x 3 3/4 Taken with Teal, I punch three small holes. Two at the top left corner and one at the bottom left corner. I put silver brads into the three holes and adhered it next to the DSP on top of the Ruby Red.
  • On a piece of 2 x 2 1/2 Whisper White, I stamped the snowman from Jolliest Time of the Year in black Stazon. I colored him with Ruby Red, Taken with Teal and Close to Cocoa and layered him onto a piece of 2 1/4 x 2 3/4 Ruby Red. Then I adhered him to the card base between the brads.
  • The flower is from the Big Shot Sizzlits dies Stampin' Up! Birds & Blooms. I used Taken with Teal and Whisper White card stock, layered them together and attached a silver brad to finish it off. The flower is attached to the card base with Stampin' Up! dimensionals.
  • Done!
I hope you enjoy this card and be sure to stop by mojo monday and try the sketch for yourself. Thanks for visiting and have a great day.

-Roberta

Wednesday, October 28, 2009

Christmas Wishes


I know I am a few days behind with Mojo Monday this week but I had a sick child on Monday and Tuesday was spent running errands and carving pumpkins. So here it is; this weeks mojo monday card.

  • I started out with a 5 x 5 square Real Red card base. Whisper White 4 3/4 x 4 3/4 is layered on.
  • I then cut a 3 1/2 x 3 and a 1 x 4 piece of Christmas Cocoa DSP (from the SU mini) and adhered them together but not to the card base yet.
  • I took Whisper White organza ribbon and wrapped it around the DSP layers. I then tied a bow with extra ribbon and adhered it to the ribbon already on the DSP with glue dots.
  • For the sentiment, I used the Fundamental Phrases stamp set to stamp "Christmas Wishes" in Real Red on Whisper White. This is layered on to Real Red and attached to the DSP.
  • The DSP is now adhered to the card base.
  • For Santa, I stamped him from the Jolliest Time of the Year stamp set in black Staz On on Whisper White.. I colored him with Real Red, Basic Grey, and Crushed Curry. On the fluffy parts of his suit, I applied Dazzling Diamonds with the two way glue pen. He is cut out and layered on a piece of Real Red that I trimmed to fit. He is attached to the card base with dimensionals.
  • Done!
I hope you enjoyed today's card and have a great day. Thanks for visiting!
-Roberta

Thursday, October 22, 2009

Halloween Gift Sack

I made this gift sack for a workshop I had recently. When I went to see what challenge Pals Paper Arts was having this week (anything but a card), I knew this is the project I would use.

  • I started out with a white paper lunch sack that I cut down to 6".
  • I adhered Old Olive 5 1/2 x 6 1/2 card stock to the front and back of the bag. Be sure to fold down the bottom of the bag so that it can open when you are finished.
  • On the front, I layered Rich Razzleberry 5 1/4 x 6 1/4 and then Cast-a-Spell DSP 5 x 6.
  • For the bear, I used the new Build-a-Bear dies in the Stampin' Up! mini catalog. The colors for the bear are Close to Cocoa, Basic Black, Very Vanilla and Cast-a-Spell DSP for the shirt and hat band. I used some Soft Suede around the edge of the broom to make it look used.
  • The sentiment is from All Holidays and is stamped in Rich Razzleberry on Whisper White. I punch out the sentiment with the Word Window punch and layered it on two Old Olive pieces I punched out from the Word Window punch. The larger background piece is from the matchbox die and is done in Rich Razzleberry.
  • The handle is a 7 1/2 x 1 piece of Old Olive and is attached to the bag with silver brads.
  • Done!
I hope you enjoy this project and be sure to stop by www.palspaperarts.com to try the challenge for yourself. Thanks for visiting.

-Roberta

Wednesday, October 21, 2009

Dasher in Real Red


Mojo monday is a little late for me this week. I ordered the Dasher stamp and the Christmas Cocoa Specialty paper and it just came today. I LOVE this paper and I just had to use it. I don't have time to list the entire recipe but here are a few basics. I used Real Red everything; grossgrain ribbon, classic ink, card stock and specialty paper. My background paper is Whisper White. I used the scallop circle punch and one silver brad. All products are from Stampin' Up!.

Hope you like today's card. Thanks for visiting.
-Roberta

Friday, October 16, 2009

Texas Tree


Another Pals Paper Arts challenge. This week (week 12) is a sketch challenge. It looks like a very simple sketch, but I had a hard time deciding which stamp set I wanted to use. I was really in the mood for a Christmas card but I need more Christmas stamp sets. I finally decided on using Yippee Kiyay Holiday from Stampin' Up!

  • I started with a Very Vanilla 5 1/2 x 4 1/4 card base.
  • I used the Old Olive snowflake paper from the Merry Moments DSP. I cut two 5 1/4 x 2 pieces and adhered them to the card base.
  • For the sentiment, I started with a 1 x 5 1/2 piece of Very Vanilla. I used some non Stampin' Up! rub-ons for the sentiment and the decoration in the corner.
  • I layered this on a 1 1/4 x 5 1/2 piece of Old Olive. That was layered on a 1 1/2 x 5 1/2 piece of Riding Hood Red. This layer was adhered to the card base towards the bottom of the card.
  • For the tree, I stamped the tree from Yippee Kiyay Holiday in StazOn on Very Vanilla. I used my scallop circle punch and punched out the tree.
  • I then cut out a circle a little larger than my scallop circle in Old Olive and adhered it to the back of my tree.
  • For the last layer of my tree, I used the 1 1/4" circle punch and punched out four Riding Hood Red circles. I cut them in half and adhered them to the Old Olive circle.
  • I colored the tree and ornaments with various colors, making sure the star on top was a golden yellow. This was then adhered to the card base.
  • Done!
I hope you enjoyed this card and be sure to stop by www.palspaperarts.com to try the challenge. If you aren't into challenges, stop by anyway, there are some really nice cards.

Thanks for visiting and have a great weekend!

-Roberta

Thursday, October 15, 2009

October is Breast Cancer Awareness Month


October is Breast Cancer Awareness month as many of you know. It seems that year after year more people take notice. Even the NFL is wearing pink during the games this year! I haven't seen very many cards with the breast cancer awareness theme. I don't know if I am looking in the wrongs spots or if there just aren't many people making the cards.

I decided to make this card after looking through the Stampin' Up! Idea Book & Catalog. On page 58, there is a card made with the Loads of Love stamp set. I knew right away that this was the set to use. I used a similar layout but different colors.

  • I started with a 5 1/2 x 4 1/4 piece of Regal Rose as my card base. I used the corner rounder punch to round all my corners.
  • On a 5 1/4 x 4 piece of Very Vanilla, I stamped the swirl from the Yummy stamp set in Melon Mambo in the corners. Again, I rounded all my corners. This was adhered the the card base.
  • On a small piece of Regal Rose, I stamped the truck from the Loads of Love set in Basic Grey. I cut the truck out leaving the wheels off. The wheels were stamped on Very Vanilla and adhered to the truck; as was the lady driving.
  • The sentiment was stamped with Melon Mambo on Very Vanilla.
  • I layered a piece of 2 x 5/4 Melon Mambo DSP on a piece of 2 1/4 x 5 1/4 Regal Rose. These were layered on a piece of 2 1/2 x 5 1/4 Melon Mambo; which was adhered to the card base. (Don't forget to round all your corners!)
  • Finally, the truck and sentiment were layered on the card base. Done!

I hope you enjoyed this card and don't forget to show your support for Breast Cancer Awareness Month. Thanks for visiting.

-Roberta

Friday, October 9, 2009

Rootin Tootin Halloween


Today's card is for Pals Paper Arts challenge #11. This week's challenge is to make a card using Perfect Plum, Old Olive and Pumpkin Pie.

  • I started with a 5 1/4 x 4 1/2 card base of Old Olive.
  • I layered a piece of 5 x 4 1/4 Pumpkin Pie on the card base and a 4 3/4 x 4 Perfect Plum DSP on top of that.
  • On a piece of 1 3/4 x 2 1/8 Very Vanilla, I stamped the Halloween girl from "Yippee Kiyay Holiday" in Going Grey. She is colored with Old Olive, Pumpkin Pie and Creamy Caramel.
  • I layered the girl on a piece of 2 1/16 x 2 3/8 Pumpkin Pie.
  • Next, I cut four 1" squares of Old Olive and adhered them to the corners of the layered girl.
  • This piece gets layered on the middle of the card base and you are done!

I hope you enjoyed this card and be sure to stop by www.palspaperarts.com to try the challenge for yourself. Thanks for visiting and have a great weekend! I have the Scarecrow Festival in Chappell Hill, TX to go to this weekend. I hope it doesn't rain.

-Roberta

Thursday, October 1, 2009

Thanks


Today's card is for Pals Paper Arts Theme Challenge. The challenge is to make a "Gratitude & Thanks" card. It could be for something(one) you are thankful for, a simple note of thanks or a Thanksgiving motif. I chose to go with the simple note of thanks.

  • I started with a Basic Black 4 1/4 x 5 1/2 card base. Onto that I layered a 4 x 5 1/4 piece of Very Vanilla.
  • I stamped the bear from "Under the Stars" in Chocolate Chip on Very Vanilla. He is colored with Close to Cocoa and Creamy Caramel. I cut him out and adhered him to a 3 3/4 x 2 1/2 piece of Night of Navy DSP.
  • I then used my Big Shot and the Billboard die to get the "thanks." Two silver brads are punched into the bears hands to hold the banner. The string is a piece of thread from my sewing collection. I adhered the letters to the card and then glittered them with Dazzling Diamonds.
  • I adhered the bear piece to the card base. I cut a piece of 3 3/4 x 2 1/2 Night of Navy and adhered it to the top of the card base. On the Night of Navy piece, I versamarked stars to give it a little something extra.
  • For the sentiment, I used the Beary Nice Wishes stamp set. I stamped it in Ruby Red and layered it onto Ruby Red DSP. This I adhered at an angle on the card base.
  • Done!

Thanks for visiting and be sure to stop by www.palspaperarts.com to try the challenge for yourself. You will be glad that you did.

-Roberta

Friday, September 25, 2009

Give Thanks


Today's card is for Pals Paper Arts Picture Perfect Inspiration Challenge PPA-9. The rules are simple. Make a project using this picture as your inspiration. You can use colors, photo elements, or overall theme. I chose to mimic the brown table and the green pottery.


For this card, I started with a 4 1/4 x 5 1/2 Very Vanilla card base.
  • I cut a piece of 1 x 5 1/2 Chocolate Chip and adhered it to the bottom edge of the card base.
  • I then cut a piece of 1 1/2 x 3 1/2 and 2 1/2 x 2 Merry Moments green striped DSP.
  • I layered those pieces on to 3 3/4 x 1 3/4 and 2 1/4 x 2 3/4 Pumpkin Pie. These two layers got adhered to the card base offsetting each other.
  • Next, I took the "Give Thanks" stamp from the Holiday Best stamp set and colored it with Crushed Curry, Soft Suede, and Dusty Durango to give it the look of changing leaves. I stamped it in the upper left corner.
  • Finally, I cut out a purple, dark green and red leaf from the Autumn Harvest DSP and layered them on top of each other on the card.
  • Done!
Be sure to stop by Pals Paper Arts and try the challenge for yourself. You never know how much fun you will have. Thanks for visiting and have a great weekend.

-Roberta

Wednesday, September 23, 2009

Dear Friend


Today's card is one I made for two challenges; mojo monday 105 and color throwdown #61. I thought that it would be more fun to try to combine the two instead of making two different ones. This is the mojo monday sketch. The colors for the color throwdown are old olive, rose red, more mustard, regal rose, and chocolate chip. I know that five colors seems like a lot at first but when I put them together, I knew they would fit perfectly together.

For the card,
  • I used a 4 1/4 x 5 1/2 Chocolate Chip base.
  • 4 x 5 1/4 Old Olive is layered on top
  • With the 1 1/4 circle punch, I punch out four Rose Red circles and three Regal Rose circles. I layered the Rose Red circles on first and cut off the overlap. Then came the Regal Rose circles.
  • A 4 x 1 piece of Autumn Harvest DSP is layered on top of the circles to cover up the edges.
  • Next is the sentiment "My dear kind & wonderful friend" from the All Holidays stamp set.
  • I colored the "&" in Regal Rose and then colored the other words in Rose Red to give a little definition. This 2 1/2 x 2 1/2 square is layered on a 2 3/4 x 2 3/4 More Mustard square.
  • Finally the sentiment layer is layered on to a 3 x 3 Chocolate Chip square and adhered to the card.
  • Done!
Thanks for visiting and be sure to check out mojo monday and color throwdown to try your hand at them.

-Roberta

Friday, September 18, 2009

Trick or Treat


Another simple one! I saw this layout on splitcoaststampers and knew immediately that it would work perfectly with the Cast-a-Spell DSP.

  • I started out with a standard card 4 1/4 x 5 1/2 Whisper White.
  • A 4 x 3 3/4 piece of Perfect Plum is adhered onto the card base.
  • On top goes a piece of 3 3/4 x 3 1/2 Cast-a-Spell DSP.
  • In the bottom right corner, I stamped "Trick or Treat" from Holiday Best. I colored the stamp with Old Olive, Pumpkin Pie, and Perfect Plum to give the card more color.
  • Done!

I hope you have fun making your own version of this card and have a great weekend. Thanks for visiting!

-Roberta

Thursday, September 17, 2009

Cherish


Today's card is for Pals Paper Arts K.I.S.S. challenge. I knew right away which stamp I was going to use because we just got back from a destination wedding. It was beautiful and simple. The couple got married on the beach at sunset.


Now for the card. I used Whisper White and Elegant Eggplant as my only two colors. The bride and groom is from the To Have & to Hold set which is retired. I added some "bling" with the Dazzling Diamonds glitter to the flowers and the sentiment. The word "cherish" is from the warm words stamp set and punched with the word window punch.


I hope you like the card and be sure to go to www.palspaperarts.com to participate in the challenge. You just might get addicted like I am. Thanks for visiting and have a nice day.


-Roberta

Tuesday, September 15, 2009

Where have I been?

Sorry I haven't posted in a few days. I just got back from vacation in Cabo San Lucas, Mexico. We had lots of fun and did so much in just a few days. I wanted to post pictures and tell all about what we did but now the camera is not working right. Perfect timing right?! A least the camera worked in Cabo. I will try and post some pictures as soon as the camera starts working correctly. Thanks for visiting.

-Roberta

Wednesday, September 9, 2009

Sparkly and bright


Today's card is for mojo monday. I know that I am a few days late but I have a lot going on this week. For this card, I used Very Vanilla, Chocolate Chip and Merry Moments DSP. I also used the new Sparkly & Bright stamp set on page 41 of the Stampin' Up! IBC.


Sorry about the picture quality. It has been raining here so the sun did not give me the light that I needed.


Thanks for visiting and be sure to stop by and try out the mojo monday sketch for yourself.


-Roberta

Friday, September 4, 2009

Build a jack o lantern


I just received my box of stuff from the new Stampin' Up! Holiday Mini! I ordered all of the Build-A-Bear dies and just had to try them out. Isn't he super cute?

  • I used the big shot and the dies to create the bear and the jack o lantern costume. The bear is Close to Cocoa and the jack o lantern is Only Orange.
  • My card is a regular 5 1/2 x 4 1/4 size in Basic Black.
  • I used a piece of 5 1/4 x 4 orange stripe from the Pawsitively Prints DSP.
  • The "Trick or Treat" is from Holiday Best. It is stamped with Only Orange on 1 1/16 x 2 1/16 Whisper White with tow opposed corners punched with the ticket corner punch.
  • Layer this onto a piece of 2 3/16 x 1 3/16 Basic Black with two opposed corners punched with ticket punch. Adhere to card.
  • Done!

Thanks for visiting and have a great long Labor Day weekend!!


-Roberta

Thursday, September 3, 2009

Love Birds


It is time to play at PPA. This weeks challenge is a color challenge using Brocade Blue, Crushed Curry and Ruby Red. I didn't know what stamps I could possibly have that would work for this color combo. I haven't used these birds yet so I thought I would come up with something. Next, I had to decide on a layout. I had several to chose from and ultimately decided on this one.


  • First, cut your Brocade Blue to 8 1/2 x 5 1/2 and fold in half. This will be your card base.
  • Next cut a piece of Ruby Red to 5 1/2 x 2 1/2. Along the bottom edge, make a mark at 2 1/4 and 3 1/4. Line up on corner with your 2 1/4 mark on your paper cutter and cut. Cut the other side from the corner to your 3 1/2 mark. You should have a trapezoid.
  • For the bottom piece, use a piece of 5 1/2 x 1 3/4 Ruby Red. Mark and cut at 2 1/4 and 3 1/4. Adhere both pieces to your card base.
  • For the birds, take a 4 1/2 x 1 1/4 piece of Whisper White and stamp the birds in Basic Grey. Color the birds with Brocade Blue, the beaks with Crushed Curry and the hearts with Ruby Red. Adhere to 1 1/2 x 4 3/4 piece of Crushed Curry and adhere layers to card base.
  • With the XOXOXO stamp from Fundamental Phrases, stamp Crushed Curry on 1/2 x 1 1/4 piece of Whisper White. Adhere this to 3/4 x 1 1/2 piece of Crushed Curry and attach to card base lower right corner.
  • Finally, apply Crystal Effects to hearts to give them a shine.
  • Done!


Thanks for visiting and be sure to visit Pals Paper Arts to play along. See you next time.


-Roberta

Wednesday, September 2, 2009

Happy Halloween!


It is getting close to Halloween so I thought I should share this with you. This card is very simple and easy to do. I used Stampin' Up! Basic Black card stock as the card base (4 1/4 x 5 1/2). For the pumpkins, I used The More the Merrier hostess set. I stamped them in Only Orange on Whisper White. Then I sponged on some more Only Orange to soften the white. I mounted this onto a piece of Only Orange with some of the organza ribbon tied around it. On the Whisper White, I stamped "Happy Halloween" in Only Orange. I found these orange eyelets in my stash of sewing stuff. I do not know where they came from only that there are multiple colors in the pack. Finally, I layered everything together to get the Halloween card you see.


Also, I just wanted to let you know that the Stampin' Up! Holiday Mini Catalog went "live" Sept. 1. This means you can now order items that will only be available for a limited time. Some of the products in the Mini include lots of Christmas stamp sets, the new sweet treat cups and envelopes and the new Build-A-Bear collection. You won't want to miss out on all these great items, so contact me today to build your collection!


Thanks for visiting and have a great day!

-Roberta

Thursday, August 27, 2009

Trick or Treat


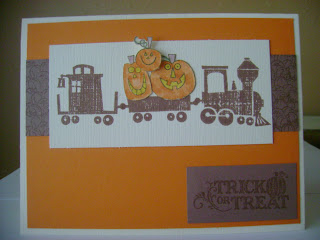
Today's card is for Pals Paper Arts (PPA). The challenge was to make a Halloween project. I did a card because I find them easier. It took me a while to get started because I don't have any Halloween stamps sets or designer paper. I was looking through my stamps and found "Choo Choo" which I haven't used in awhile.


I decided to stamp the pumpkins from "The More the Merrier" on Very Vanilla, cut them out and stack three of them in the cargo piece of the train. I also decided to make my own "designer" paper. I stamped the pumpkins from "Loads of Love Accessories" in versmark on Close to Cocoa. I also used Versamark to stamp "Trick or Treat" from "Holiday Best" on Close to Cocoa for the sentiment. The orange is Pumpkin Pie.


Be sure to stop by www.palspaperarts.com to join in the challenge. You might even get addicted like me!


Thanks for visiting and I hope you enjoy this card.


-Roberta
Wednesday, August 26, 2009

Patchwork Christmas


Today's card is one based on a mojo monday sketch by Mary Fish. I have been doing a lot of Christmas cards lately and when I saw this sketch, I knew it would be perfect for the Merry Moments DSP. Here is her sketch. As you can see, I used the same layout except for the brads. I used mine to frame the larger image. I love this sketch and am planning to use it with some of my other designer papers.

The card base is Very Vanilla textured card stock. I made my small squares 1 1/4" x 1 1/4". The larger layer is 2 3/4 x 3 Old Olive on top of 3 x 3 1/4 Very Vanilla. I used Versamark and the snowflakes from Christmas Punch on the Old Olive. The scallop is stamped in Old Olive with the "Merry Christmas" stamp from Holiday Best Hostess and punch with the scallop circle punch. I used the silver brads in the four corners of the Old Olive and attached everything with snail adhesive. All product are from Stampin' Up!

Thanks for visiting and I hope you enjoyed this card.


-Roberta

Monday, August 24, 2009

Once upon a Time

It's mojo monday time!! Here is the sketch for this weeks mojo monday. I followed the sketch pretty closely this week. Even my color choices are almost the same.


The ribbon is the only non SU product I used on this card. I am not going to do a recipe for this card today because it is very straight forward. I will tell you that I used Pink Passion on the top and Pixie Pink on the bottom. The patterned paper is Melon Mambo. I Versamardked all the words and used Pink Passion for the hearts. The ribbon says "princess" all over it and has green butterflies and the dark pink crown. I got it so long ago that I do not remember where I got it from.


Thanks for visiting and I hope you enjoyed the card for mojo101.


-Roberta

Friday, August 21, 2009

3 x 3 Holiday Note Cards


No challenges today. Just a little collection of 3 x 3 note cards I made. I was trying to make a purse but it wasn't turning out the way I wanted. The card stock was already cut and not big enough of a traditional card so this is what I ended up with. I like the way they came out. I used Garden Green for the base on all the cards today.


For this first card, I stamped "be merry" from Warm Words onto a piece of 2 3/4 x 2 3/4 Merry Moments Dsp. I then took another piece of Merry Moments DSP and cut out the big red snowflake. I glued the cut out snowflake on top of the red snowflake on my 2 3/4 x 2 3/4 piece. I then rounded the corners and adhered it to the card base. Done!


This one is very simple. Take a piece of 2 3/4 x 2 3/4 Whisper White and stamp the snowflakes from Christmas Punch all over in Garden Green. Adhere to card base. Next, on a piece of 1/2 x 1 3/4 Whisper White, stamp "warm winter wishes" from The More the Merrier in Garden Green. Round corners and layer on 3/4 x 2 Garden Green with round corners. Layer this onto card base. Done!


This one doesn't use any stamps! Punch out a big snowflake from the Merry Moments DSP with a scallop circle punch and layer it on to a piece of 2 x 2 Whisper White. Adhere to bottom right corner on card base. Cut two pieces of 1/2 x 3 Merry Moments stripes and adhere to left side and top of card base. Done!


Simple, Simple. Cut out a piece of 2 3/4 x 2 3/4 Merry Moments DSP and adhere to card base. On Whisper White stamp "A merry little Christmas to you" from Christmas Punch in Garden Green and cut out. Adhere to middle of card base. Done!


Now for my favorite. Cut out a piece of 2 3/4 x 2 3/4 Merry Moments colored stripes and adhere to card base. Cut out a piece of 2 x 2 Garden Green and adhere to card base in middle as a diamond. On Very Vanilla stamp "Merry Christmas" from Holiday Best in Chocolate Chip. Punch out with scallop circle punch and adhere to card base in middle of diamond. Done!


Thanks for visiting and have a great weekend!


-Roberta

Thursday, August 20, 2009

be merry


Two challenges mean two posts! I couldn't combine these challenges. One was a card and the other was anything but a card. This one is for mojo monday turns 100 day 4. Here is the sketch we were supposed to use. As you can see, I didn't use the exact sketch, but that is okay. I am not going to do a complete recipe for this card because there is a lot to it. It is not complicated but with two posts, I don't want to write too much. I did use The More the Merrier set, Two Cool Dudes, Eat Cake and Warm Words. The colors are Handsome Hunter, Bravo Burgundy and Whisper White with a little Ballet Blue and Versamark. If you want more info, just write me a comment and I will get back to you.


Thanks for visiting and have a good day. Remember Tax Free Weekend in Texas starts tomorrow and Stampin' Up! has some things available tax free!! Send me a comment if you want more info on how and when you can save.


-Roberta

Scallop Enve Box


I love to play at PPA! This weeks challenge is to make anything but a card. I saw this tutorial on Splitcoaststampers.com and new I had to try it. It is a scallop envelop box. It is very easy.
  • First cut out four scallop envelopes using your big shot. I used Pacific Point textured card stock because I love that color and am sad it retired.
  • Next, glue the flaps of the envelopes together to form a cube.
  • Now fold the bottoms under overlapping them. They should stay by themselves, but I glued them just to make sure they would stay.
  • Take a piece of 2 1/8 x 12 1/2 DSP, I used Delicate Dots because I have a lot and it looks good with Pacific Point. Adhere one side to the front of your box. Wrap the DSP around the box, creasing the corners as you go. Adhere the other edge to the front. The edges won't match up but that is okay, it will get covered up.
  • Layer a piece of 2 1/8 x 2 3/4 card stock the same color as your box (Pacific Point) onto a piece of 2 x 2 1/2 Whisper White. Stamp your sentiment on the Whisper White in the same color as your box. I used the Yummy stamp set. Attach this layer to your box. I also added a little "with love" sentiment at the bottom in Pink Pirouette.
  • Done!
I used all retired elements because I had plenty of them and I really like the colors and how they go together. This will obviously work with any color combo that you wish to use.


Thanks for visiting and be sure to stop by www.palspaperarts.com and play along. You will be saying "I love to play at PPA!" before you know it.


-Roberta

Wednesday, August 19, 2009

Holiday Cheer


Today is another mojo monday. The sketch is from day 3 mojoteresa. You can get more info and play along at mojomonday.blogspot.com.


Here is the recipe.
  • First take a piece of 8 1/2 x 5 1/2 Basic Black and fold in half to make your card base.
  • Next cut a piece of 5 1/4 x 4 Holiday Lounge DSP and adhere to card base.
  • Cut a piece of 3 x 1 1/4 Basic Gray textured card stock and adhere to cardbase 3/8" from bottom.
  • Now cut another piece of Holiday Lounge DSP to 5 1/4 x 2 and adhere to card base.
  • With the tree paper from Holiday Lounge DSP, cut a piece 1 1/2 x 5 1/4. Trim edge to border trees and adhere to card base.
  • On a piece of 2 3/4 x 2 Whisper White, Stamp the truck from Loads of Love in Basic Gray. Color in with Taken with Teal marker. Stamp lady from LOL accessories in Ruby Red. Adhere to card base.
  • On Basic Gray, stamp "Wishing you Loads of holiday cheer!" from LOL set in Ruby Red. Punch out with scallop circle punch. Attach to card with dimensionals.
  • To make your button, follow the directions from this post from splitcoaststampers. http://www.splitcoaststampers.com/forums/showthread.php?t=454034 The tutorial is not fully in English but she has lots of pictures and some descriptions in English. Attach a sliver of Whisper White to the button as thread and adhere button to truck bed.
  • Done!

I don't have any glossy accents or clear embossing powder so my button doesn't shine. I had a lot of fun making this button and will probably make more. Thanks for visiting and have a good day.


-Roberta